Ingredients:
- For the Sand Base:
- Sugar: 50 grams
- Flour: 150 grams
- Butter: 100 grams, softened
- For the Quick Caramel:
- Butter: 100 grams
- Sugar: 80 grams
- Condensed Milk: 1 can (approximately 397 grams)
- For the Filling:
- Milk Chocolate: 200 grams, chopped
- Butter: 10 grams
Steps:
- Make the Sand Base Dough: Gradually add the flour to the butter and sugar mixture, mixing until a crumbly dough forms. The dough should come together but still have a sandy texture. Press the dough evenly into the base of the prepared baking pan, ensuring it’s spread evenly across the bottom. Use a spoon or your fingers to press it down gently. Bake in the for about 12-15 minutes, or until the base turns golden brown and firm. Once baked, set it aside to cool completely while you prepare the caramel layer.
- Prepare the Sand Base: Start by preheating your oven to 180°C (350°F). Grease and line a square baking pan (approximately 9×9 inches) with parchment paper for easy removal later. In a medium-sized mixing bowl, combine the softened butter and sugar. Using an electric mixer or a whisk, beat the mixture until it becomes light and creamy. This may take about 2-3 minutes.
- Make the Milk Chocolate Filling: While the caramel is setting, prepare the milk chocolate filling. In a heatproof bowl, combine the chopped milk chocolate and butter. Melt the mixture gently using a double boiler or microwave in 30-second intervals, stirring well in between. Once the chocolate and butter have melted together and formed a smooth, glossy mixture, remove it from the heat and allow it to cool slightly.
- Make the Quick Caramel: In a medium saucepan, combine the condensed milk, butter, and sugar over medium heat. Stir constantly to prevent the mixture from burning. As the butter melts and the sugar dissolves, the mixture will begin to thicken. Continue stirring for about 5-7 minutes, until the caramel reaches a smooth, thick consistency. Be careful not to overcook it, as it can become too hard. Once the caramel is ready, pour it evenly over the cooled sand base. Use a spatula to spread it out if necessary. Allow the caramel layer to cool and set for about 30 minutes at room temperature or place it in the fridge for faster setting.
- Assemble the Slice: Once the caramel layer has set and the milk chocolate filling has cooled slightly, pour the melted chocolate mixture over the caramel layer. Spread it out evenly with a spatula or back of a spoon, making sure it covers the entire surface. Place the pan in the to set for at least 1 hour, or until the chocolate has hardened.
- Cut and Serve: Once the chocolate filling has set, remove the caramel slice from the pan using the parchment paper. Place it on a cutting board and slice it into squares or bars, depending on your preference. Serve and enjoy this indulgent treat with a cup of coffee or a glass of milk. It’s perfect for any occasion, from casual get-togethers to festive celebrations.
Prep Time:
20 minutes
Total Time:
2 hours (includes cooling and setting time)
Cooking Time:
15 minutes (for sand base and caramel)
KCAL (Approximate per serving, based on 12 servings):
Calories: 350 kcal
Carbs: 40 g
Fat: 22 g
Protein: 3 g
Sugar: 30 g
Servings:
12 servings (varies depending on portion size)
Explanation of the Recipe and Why It’s Timeless:
What makes this dessert timeless is its combination of textures—crispy, gooey, and creamy—all in one bite. Each layer is distinct but complements the others, creating a perfect balance of sweetness. Additionally, the simplicity of the ingredients makes it accessible to any home cook, whether you’re an experienced baker or a beginner. This recipe doesn’t require fancy techniques or ingredients, yet the result is something that feels special and indulgent.
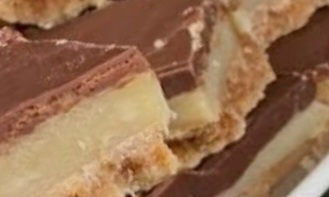
This Decadent Caramel Slice with Milk Chocolate Filling is a dessert that has stood the test of time because it blends simple ingredients into an indulgent, multi-layered treat. The sand base, made from just butter, sugar, and flour, provides a light, crisp foundation. The quick caramel is a beautiful golden layer, rich and smooth, made even more delicious by the condensed milk that gives it that perfect caramelized flavor. The milk chocolate topping adds a luxurious finish, making this slice truly irresistible.
Another timeless aspect is its versatility. This slice is perfect for a variety of occasions, whether you’re hosting a casual afternoon tea, celebrating a special occasion, or looking for a sweet treat to share with friends and family. The caramel slice can be enjoyed by people of all ages, and it’s guaranteed to bring a smile to anyone who takes a bite.
Nutrition Facts (Approximate per Serving, based on 12 servings):
- Carbohydrates: 40 g
- Calories: 350 kcal
- Fat: 22 g
- Protein: 3 g
- Sugar: 30 g
- Fiber: 1 g
- Sodium: 80 mg
FAQs:
- Can I make this dessert ahead of time?
Absolutely! This caramel slice can be made a day or two in advance. Simply store it in the covered with plastic wrap or in an to keep it fresh. - Can I use dark chocolate instead of milk chocolate?
Yes, you can substitute dark chocolate for milk chocolate if you prefer a more intense, slightly less sweet flavor. Dark chocolate will give the slice a deeper flavor profile, but make sure to adjust the sweetness of the caramel if needed. - Can I freeze the caramel slice?
Yes, this dessert can be frozen for up to 3 months. Be sure to slice the caramel slice before freezing, and store it in a freezer-safe container or tightly wrapped in plastic wrap and foil to prevent freezer burn. To enjoy, simply thaw in the refrigerator for several hours before serving. - What can I do if the caramel is too thick?
If the caramel becomes too thick during cooking, you can add a tablespoon or two of milk to thin it out to your desired consistency. Make sure to stir well to incorporate the milk evenly into the caramel.
Tips for Making the Best Caramel Slice:
- Use Softened Butter:
Be sure that your butter is softened when making the sand base. This ensures it will mix evenly with the sugar and flour, creating a smooth, crumbly dough that bakes up perfectly. - Allow Layers to Cool:
Be patient and let each layer cool completely before adding the next. This ensures that each layer sets properly and that the caramel and chocolate stay intact without mixing into the others. - Control the Caramel Thickness:
The consistency of the caramel is crucial. Keep an eye on it while cooking to ensure it doesn’t get too thick or too thin. Stir constantly to avoid burning, and don’t let it simmer for too long. If it thickens too much, just add a splash of milk to loosen it up. - Chill the Slice:
Make sure to refrigerate the caramel slice for at least an hour after assembly to allow the chocolate layer to set properly. This will make it easier to cut into neat slices without the chocolate running.
Storage Tips:
- Refrigeration:
Keep the caramel slice in an in the fridge for up to 5 days. It will stay fresh and maintain its texture. - Freezing:
If you want to keep the caramel slice for a longer period, freezing is a great option. Slice the pieces before freezing and store in a freezer-safe container for up to 3 months.
Conclusion:
The Decadent Caramel Slice with Milk Chocolate Filling is a perfect combination of textures and flavors, delivering a treat that is both comforting and indulgent. Its timeless appeal lies in its simplicity, allowing you to create something extraordinary with minimal effort and accessible ingredients. Whether shared with loved ones or enjoyed solo, this dessert never fails to satisfy a sweet craving. With its perfect balance of sweetness, buttery richness, and smooth chocolate, it remains a go-to treat for any occasion, proving that sometimes, the simplest recipes are the most unforgettable. So, gather your ingredients, follow these easy steps, and prepare to indulge in a slice of heaven!